In this two-part series, Jay Dawkins, co-founder at PublicInput.com, takes a practical, local government-focused look at the design and development process for organizational innovation.
In Part 1, we covered the emergence of design sprints as a way to rapidly test ideas for solving organizational challenges. When it comes to big problems, it’s often a superior approach to brainstorming or applying agile software development.
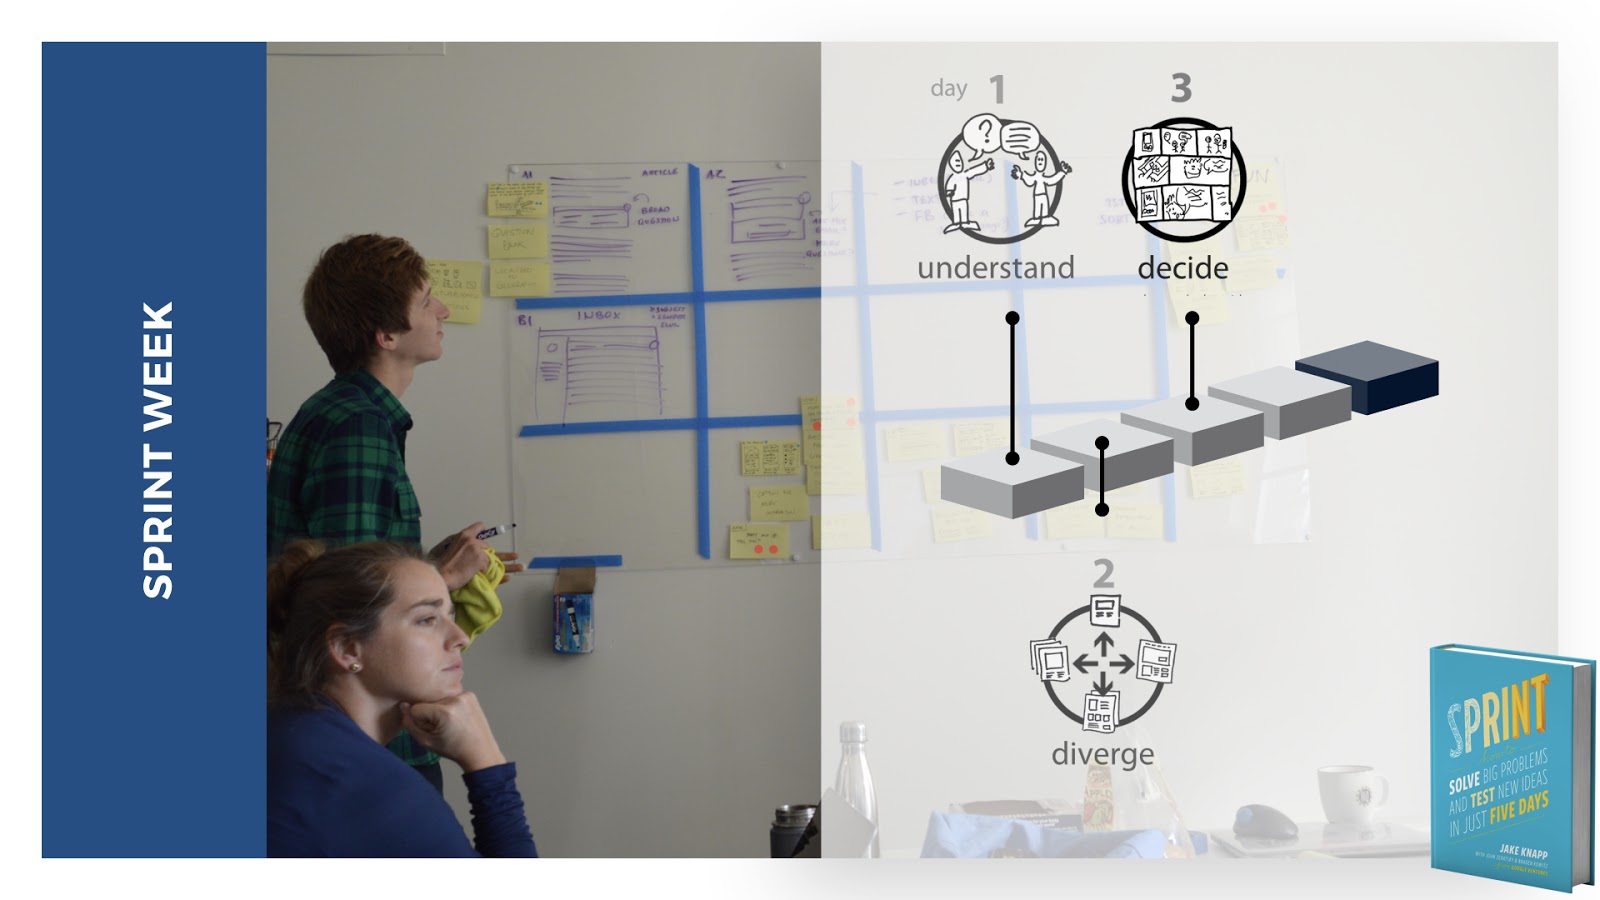
The Design Sprint Process
The Design Sprint has five key phases:
– Understand the problem
– Sketch solutions (Diverge)
– Decide on solutions to test (Converge)
– Build a prototype
– Test the prototype

These phases can happen on your own schedule, but for the purposes of simplicity, most teams go with one phase per day.
Who’s Involved?
The ideal team size is 5-7 people who represent the cross-functional organizational groups involved in a solution. Importantly, you need to include people who will be owners of the to-be-implemented solution.
You’ll especially need a high-level person in the organization that can be designated the ‘Decider’. They’ll be responsible for making key decisions during the week and helping the team avoid consensus paralysis.
Sprinting with ‘Reach NC Voices’
PublicInput.com works with public agencies across the country, but our first design sprint partner was an organization called Reach NC Voices. It’s a nonprofit dedicated to improving civic engagement across North Carolina.
Reach has used PublicInput.com to collect responses from over 60,000 North Carolinians on issues like education, healthcare, and jobs. Recently, they received a grant from from the CUNY News Integrity Initiative to answer a bigger question: How can organizations better engage communities to deepen relationships and build trust?
To address this question, we focused our design sprint on learning how to get a higher number of past participants to re-engage with follow-up questions and content. For example, if a resident shares their feedback on a housing issue, how can we get them to share insight on another topic, like education, parks, or transit?
With that in mind, let’s walk through the design sprint process step by step.
Step One: Understand the Problem
To start off the week, gather your group together in your designated room where you’ll be collaborating during the sprint. You’ll set the ground rules, which include:
- Ask for people’s full attention and time. Say: “We understand if you need to take a call, please be considerate of people’s time and step out if it is critical.”
- Laptops closed until they are needed
- Mobile phones put away
- Ask for permission to move people fast and cut them off, this is a sprint for a reason.
This step (or day in our case) is all about getting as much information into your group’s shared pool of knowledge as possible. You’ll then digest this and choose a target for your week.
Several approaches are used to structure conversations on this day, including:
- User journey mapping to understand how your ‘customer’ experiences your key problem (example)
- Expert interviews, featuring 10-15 minute lightning talks with people with deep knowledge of the challenge at hand
- “How might we” notetaking to move from uncertainty to curiosity (photos here)
- “Note-and-vote” to separate ideas from their creators and let winners rise to the top

For PublicInput.com’s sprint with the Reach NC Voices team, we identified a critical point in the public engagement cycle to improve upon – closing the engagement loop with a past participant through an email update.
Our goal for the week was to test different approaches to following up with past participants, and see which ones were most likely to drive additional participation.
Step Two: Sketch Solutions (Diverge)
After getting a clear-headed understanding of your problem and choosing a target for your sprint, you now get to focus on solutions.
To get started, you’ll do a bit of show-and-tell of ways other organizations are solving related problems. These are called ‘lightning rounds’, and each member of your sprint team gets to present their favorite examples to the table.
Then, drawing inspiration from these examples, it’s time for some heads-down sketching. The thought here is to “work alone together”. Each person individually puts to paper their best ideas to solve the problem.
Don’t worry – this sketching is less about artistry and all about critical thinking. It’s also structured to help transform abstract ideas into something more concrete:
- “Crazy Eights” where you fold 8.5×11 paper into 8 frames and sketch a variation of your best ideas (some of these are visible in the photos here)
- Silently walk around the room and gather notes from step one HMW and mapping notes
- “Solution sketch” using post-it notes to create a three-panel storyboard
You’ll close out this step without critiquing these sketches – this step is all about getting great ideas onto paper. The next step will bring these together into a testable solution.

Step Three: Decide What to Prototype (Converge)
Now you’ll have a stack of solutions on the table from your sketching. These ideas are great, but there will be too many of them.
This step is all about selecting the best elements from these solutions and compiling them into a solid plan. To get there, you will:
- Separate each solution from its creator (anonymize it)
- Critique each solution in a structured process
- Choose the solutions that have the best chance of achieving your goal
Once you’ve narrowed down your solution set, you’ll take winning scenes from your sketches and weave them together into a storyboard (see below).

Nevertheless, you must press on, embracing the fact that no idea or solution is going to be perfectly ready for contact with your end user. This is how we learn.
Step Four: Build the Prototype
Your storyboard concept is now ready to become an interactive prototype for testing.
Great! Time to break out the development tools?
Nope. You’ve gotta build this in one day, so your focus will be creating a realistic façade using a tool like Apple Keynote (we like this for desktop testing) or a prototyping tool like Marvel if you’re going for a mobile-oriented solution.
- Your team can “divide and conquer” by splitting up the storyboard into smaller scenes.
- You’ll make use of all your team’s skills by assigning prototyping roles like Maker, Stitcher, Writer, and Asset Collector.
- As your team builds the prototype, you’ll want one member to make sure everything is ready for the testing interviews that follow.

Each team member took on different screens included in the user flow, and updated these in real time on iCloud. At the end, our lead UX designer went through and “stitched” together the styling of each slide to make the experience feel more cohesive.
Step Five: Test the Prototype
The moment we’ve been waiting for has arrived. You started this week with a big challenge and a great team – and little else. By now you’ve created promising solutions, picked the best, and built a testable prototype.
All of that has prepared you for the moment of impact – when you’ll get to see your end ‘customer’ or user interact with what you’ve created. This is the payoff moment where you get to be surprised and get authentic behavior-based feedback on what parts of your solution work, and what misses the mark.
For the purposes of interviews, it’s important to be able to observe your participants non-verbal reactions and see what they see.
In our case, we set up a testing room separate from our sprint room so our team could observe one-on-one interviews with test participants.
From a tech perspective, we used GotoMeeting to broadcast the prototype screen along with the laptop’s front-facing camera. We also added a second camera to show the interviewer and interviewee.
Back in the conference room, this was all displayed on a large screen where the team could take notes and share reactions.

The key to success is to take copious notes here. Post-it’s are great because you can post them on the sprint room wall in rows corresponding to each interview.
Bring it Home
At the end of the day, read your wall notes in silence and write down patterns. Make a list of all the patterns people noticed. Label each as positive, negative, or neutral.
With these themes and lessons identified, group your interview notes around these major themes. With these themes in mind, review your long-term goal and the big questions you sought to answer. Compare with the patterns you saw in the interviews. What did we learn?

Now the single most important step you’ll take:
Decide how to follow-up after the sprint and Write It Down.
All the new insights you’ve built will not become reality on their own. Think about who needs to be involved in creating the real solution and get the follow-up meetings on the calendar.
This is where the real work begins, but if you’ve applied the principles here, your work is much more likely to achieve your desired impact. And that’s a goal every organization can rally around.
Helpful Links
- If you love Trello, here’s a ready-to-go Design Sprint Trello board.
- A pretty comprehensive set of Design Sprint Resources and Tools
- The Sprint Book
- Jake Knapp’s delightful teardown of group brainstorming in this linkedin post.
About the Author

Jay Dawkins is the co-founder and CEO of PublicInput.com, a provider of community engagement software to over 50 public agencies like the City of Raleigh, San Diego, and Austin Texas.
Jay comes from a family with a deep tradition of local government service, and prior to PublicInput.com worked as a transportation engineering consultant. Today he lives in downtown Raleigh, NC with his fiancé Sarah and orange cat, Zeus.